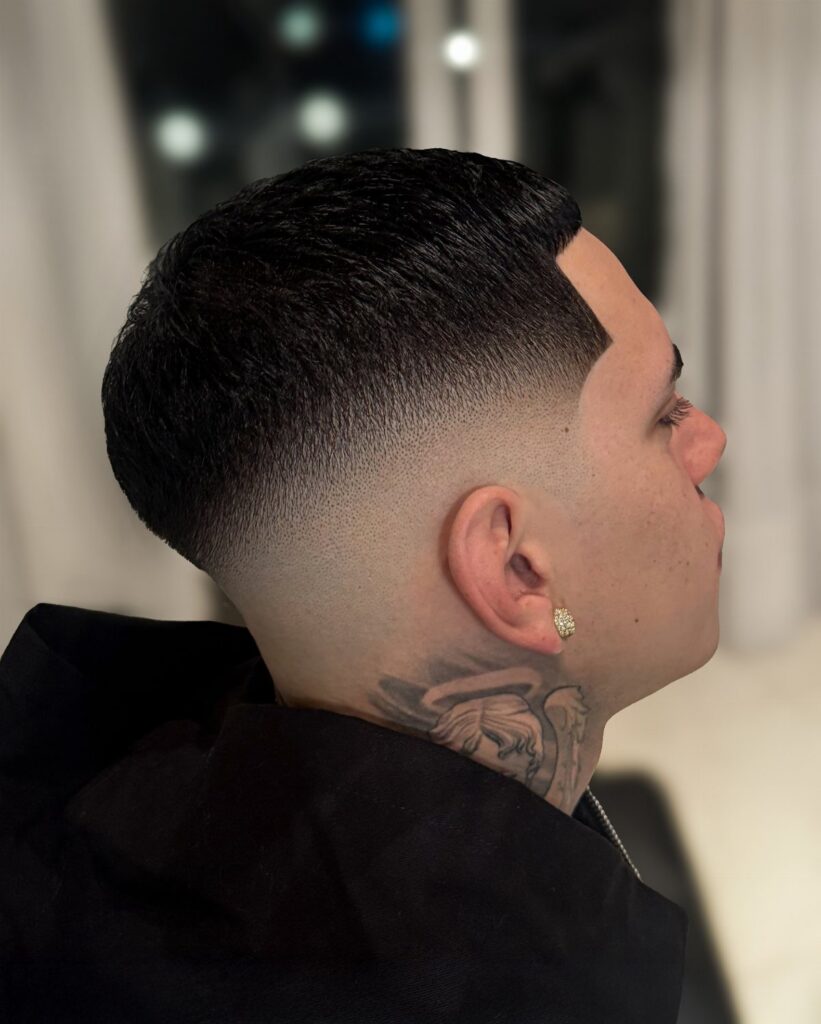
The mid fade sits halfway up the side, between ear and temple, and you choose the blend separately from whether it lands on stubble or bare skin.
Morning styling time splits these options: crops need under a minute, quiffs and pompadours want a few minutes with a dryer, slick backs and side parts take 2 minutes, and buzz cuts ask for nothing.
1. Textured Crop
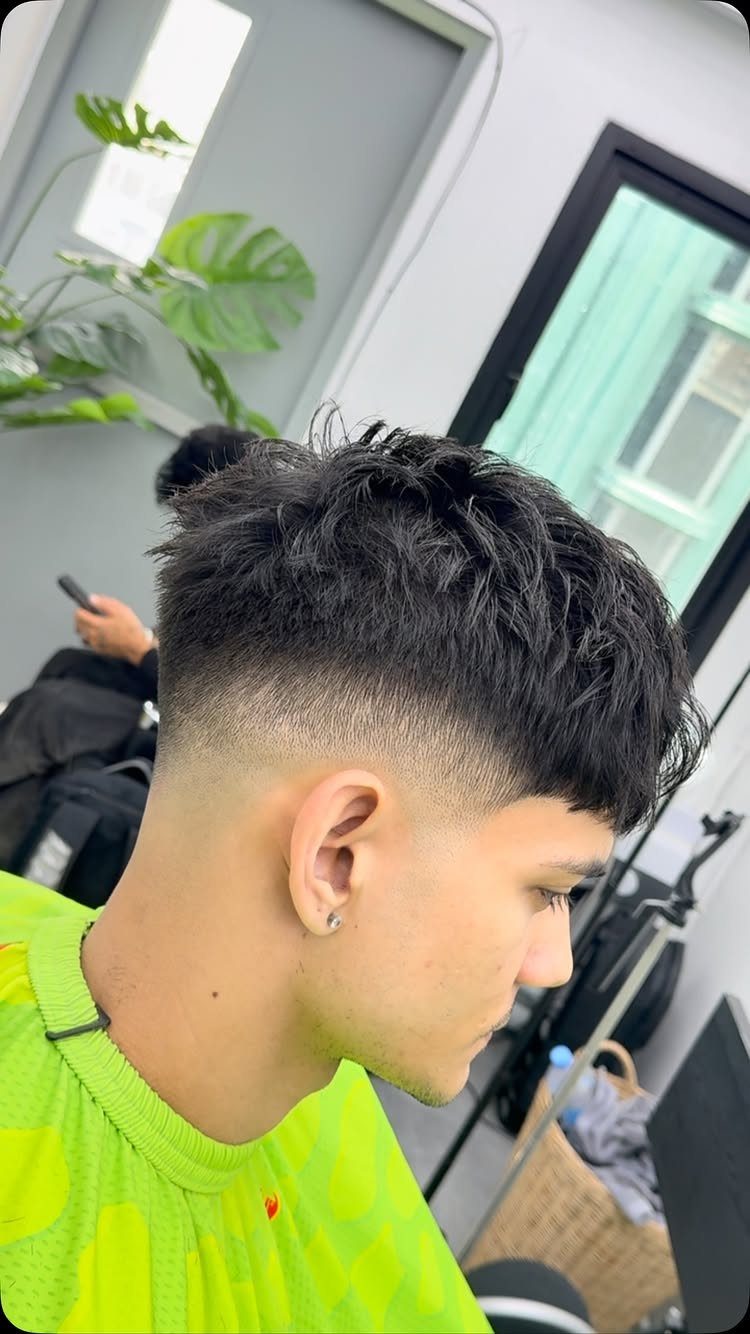
The top sits short, cut or point-cut into uneven, choppy layers that break up any solid line. A mid fade keeps the sides clean without pulling focus.
Styling takes a dime-sized amount of matte paste or clay worked through damp hair, then lifted and separated with your fingers.
The texture does most of the work, so you’re looking at under a minute once you know where your hair wants to sit.
Book a trim regularly to keep the fade sharp and the top from growing past the length where the texture reads clearly.
2. Quiff
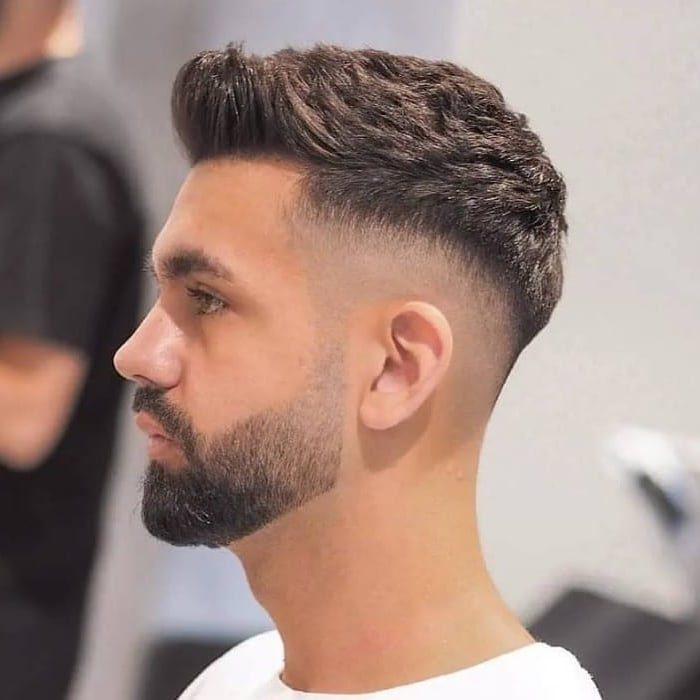
Height comes from brushing or blow-drying the front section up and back, leaving volume at the crown. The mid fade keeps the sides from competing with that lift.
You’ll need a blow dryer, a round brush or your fingers, and a medium-hold product.
Blow-dry the top forward first to build body, then push it back and set it with pomade or cream. Styling goes quickly once the routine is automatic.
The quiff grows out better than most high-volume cuts because the length on top gives you options as it gets longer. Plan on regular cleanups to keep the fade looking tight.
3. Side Part
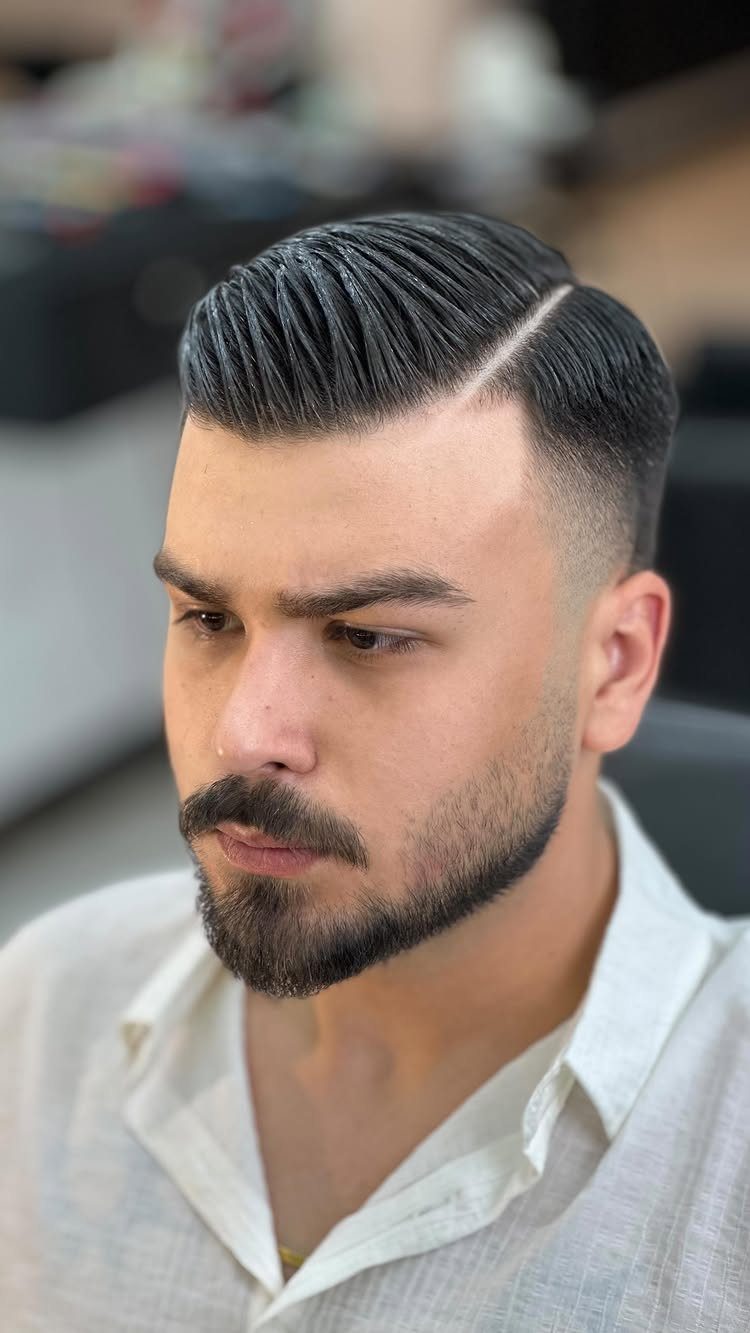
A side part divides the top into 2 sections, one combed across and the other left shorter or slicked down. The part can be razor-cut for a hard line or simply combed in.
Ask for enough length on top to comb over and a mid fade that starts around the temple. Styling is a quick comb-through with a light pomade or styling cream.
This one works across most professional and casual settings without looking out of place in either.
4. Slick Back
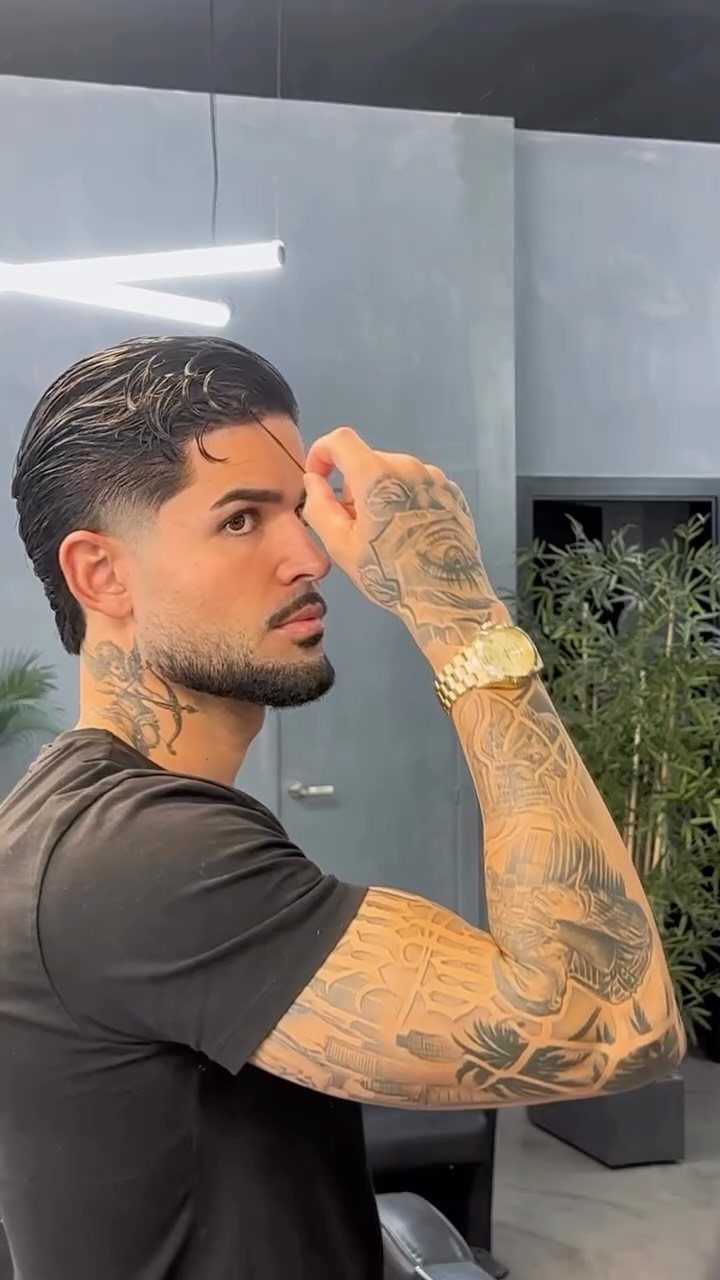
The fade drops the weight off the sides.
Use a medium to firm-hold pomade or gel on damp hair, comb it back, and let it dry.
For a looser finish, blow-dry it back first and use less product. Styling moves fast once you know the routine.
Slicked-back hair shows every cowlick and growth pattern, so if your hair has a strong forward direction, expect to work against it or choose a different style.
5. Comb Over
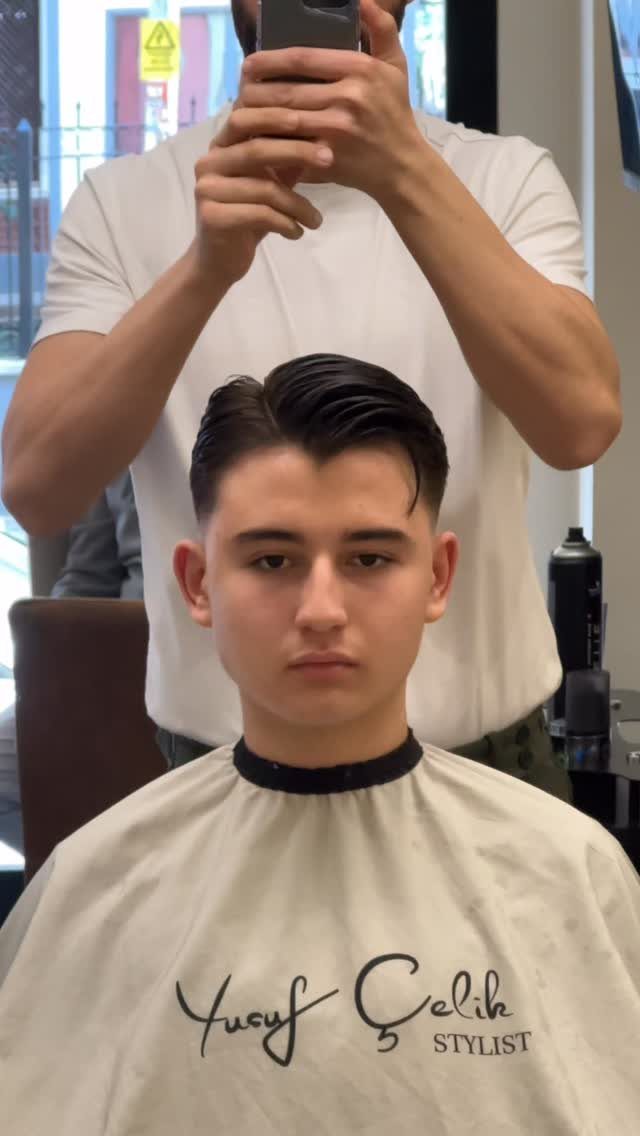
The hair moves from one side across to the other, guided by a part. The comb over works with straighter hair that lies flat when combed across.
Styling is a comb and a nickel-sized amount of light- to medium-hold product, run through damp hair and combed into place.
The part can be soft or hard-lined depending on how formal you want the look. A hard part needs regular touch-ups to stay sharp.
6. Buzz Cut
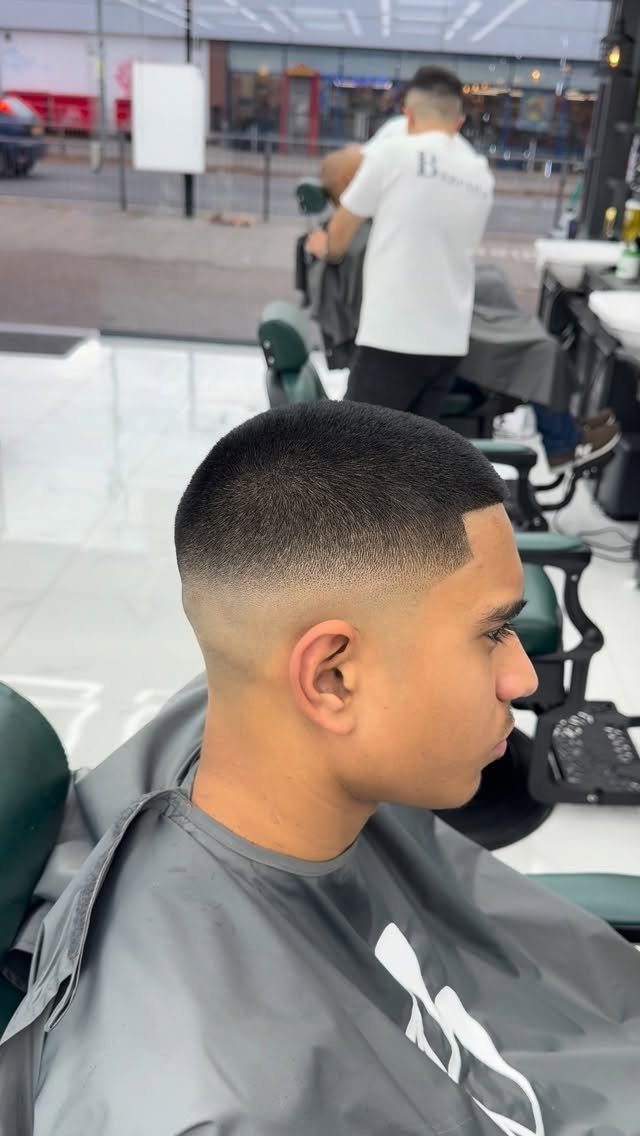
The top is clipped to a uniform guard length, often a 3 or 4, and the mid fade tapers the sides down from there. The result is low-maintenance and reads clean in any setting.
Styling is nonexistent.
Wash, towel off, and you’re done. The fade will blur as it grows, so plan on a trim every 2–3 weeks if you want it to stay sharp.
This one suits men who want a haircut that doesn’t ask for product, a blow dryer, or a mirror check before leaving the house.
The mid fade haircut looks clean and neat only when it gets trimmed regularly. Visit the barber’s chair every two to three weeks for a nice gradient.
— Laifen
7. Hard Part
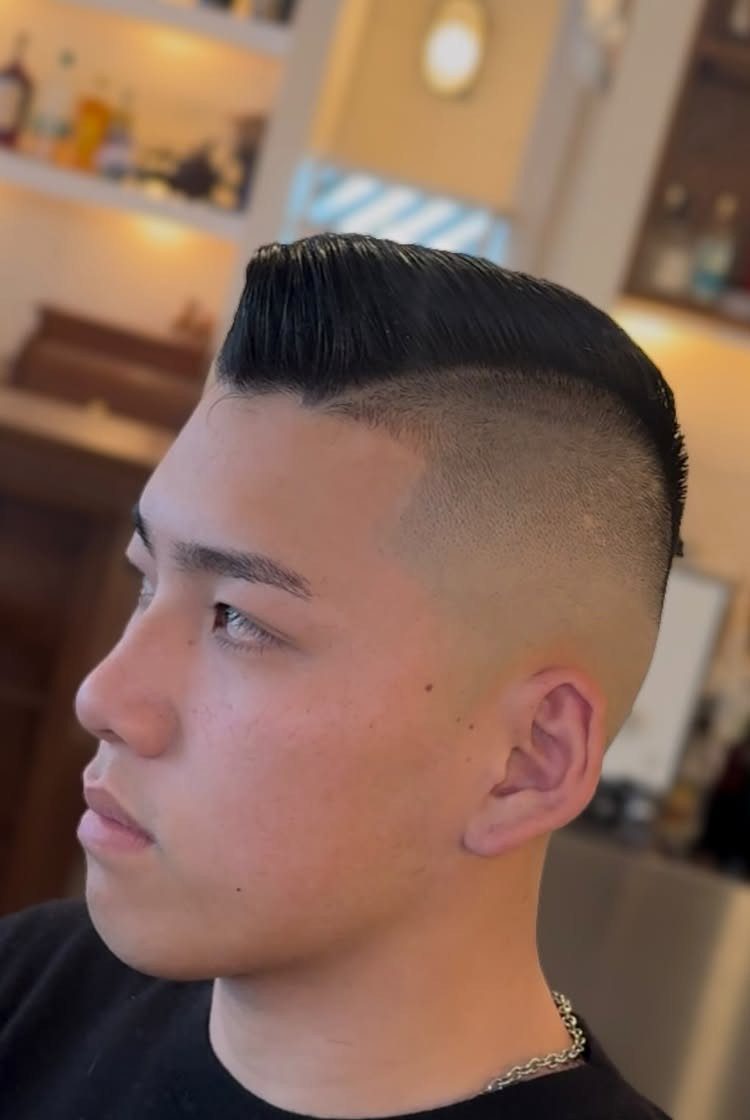
A razor shaves the part line straight into the scalp, making it visible even when the hair is slicked back or styled forward. The line stays sharp for about a week, then softens as the hair grows in.
Tell your barber where you want the part, usually an inch or two off center. The fade runs from there down.
The shaved line grows back quickly and needs frequent touch-ups to stay visible.
8. Curly Top
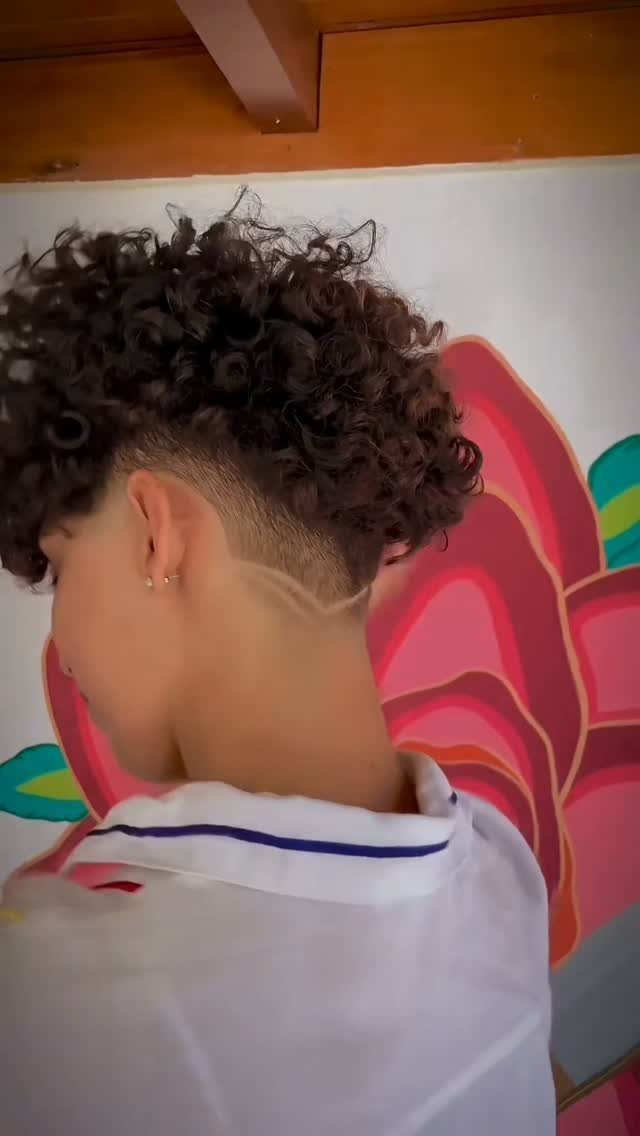
The curls stay long enough on top to show their shape, while the fade keeps the sides from adding bulk.
This works best when the curls are naturally tight or coiled, since looser waves can look unbalanced against a short fade.
Styling depends on curl type.
Most guys rake leave-in conditioner or curl cream through damp hair, then let it dry on its own or hit it with a diffuser. The fade simplifies the routine by cutting out the sides entirely.
If your curls tangle or dry out, the length on top needs more moisture than a buzz cut would.
9. Drop Fade
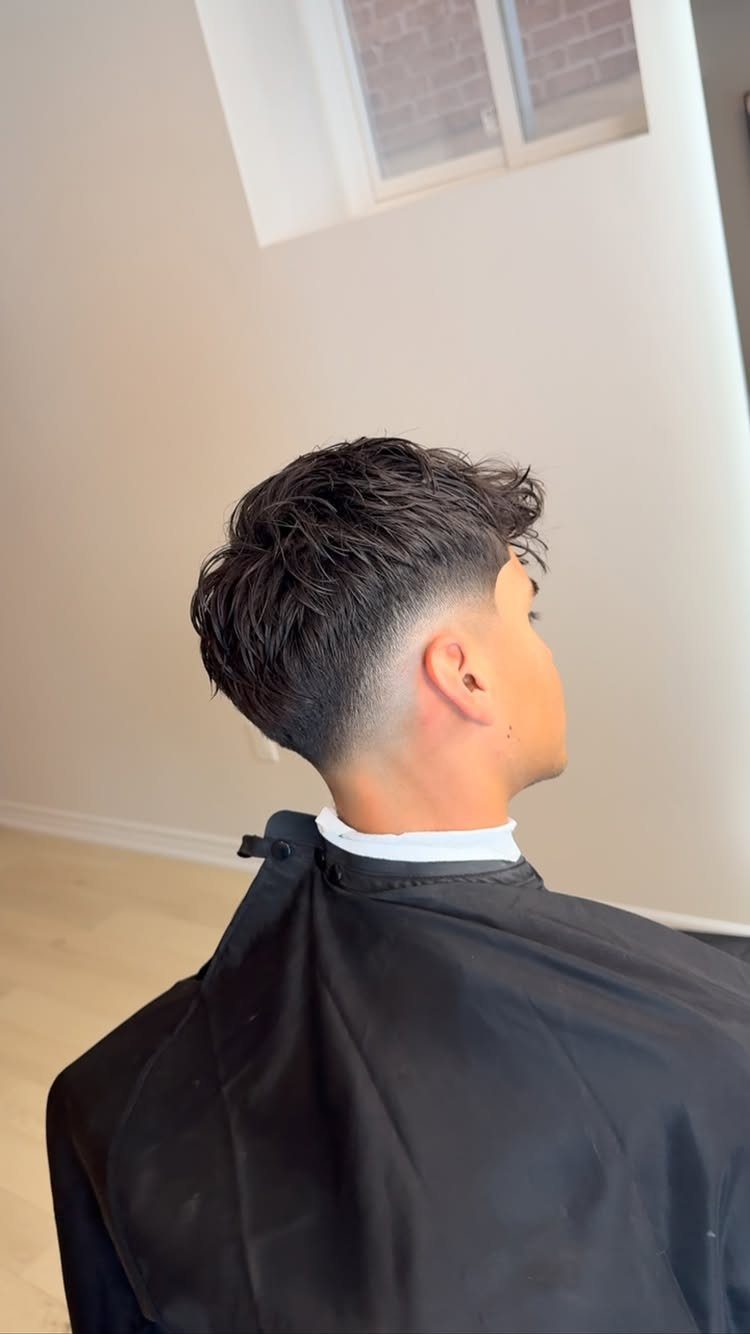
The curved drop fade arc gives the cut a softer profile than a standard mid fade.
The drop works well with most top styles, but it pairs especially cleanly with slicked-back or wavy hair because the curve doesn’t interrupt the flow.
A barber who knows where to start the drop will save you from a fade that sits too high or too low.
10. Mid Taper
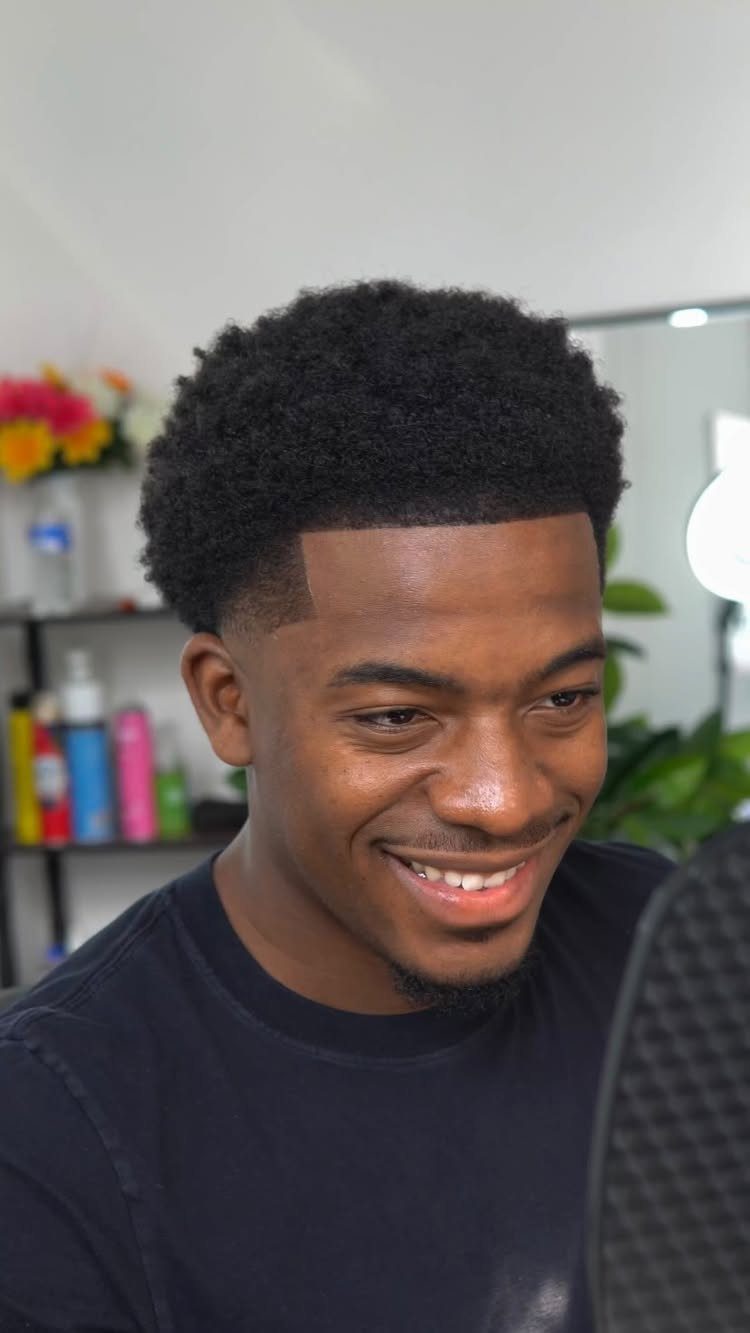
The taper blends the sides without going down to skin, leaving a soft gradient that grows out more gradually than a fade. The sideburns and nape keep more length, so the cut looks fuller and needs less frequent maintenance.
If you want the shape of a fade without constant appointments, the taper buys you more time between cuts.
Styling the top is the same as any other mid fade. The taper just changes how much attention the sides need.
11. Crew Cut
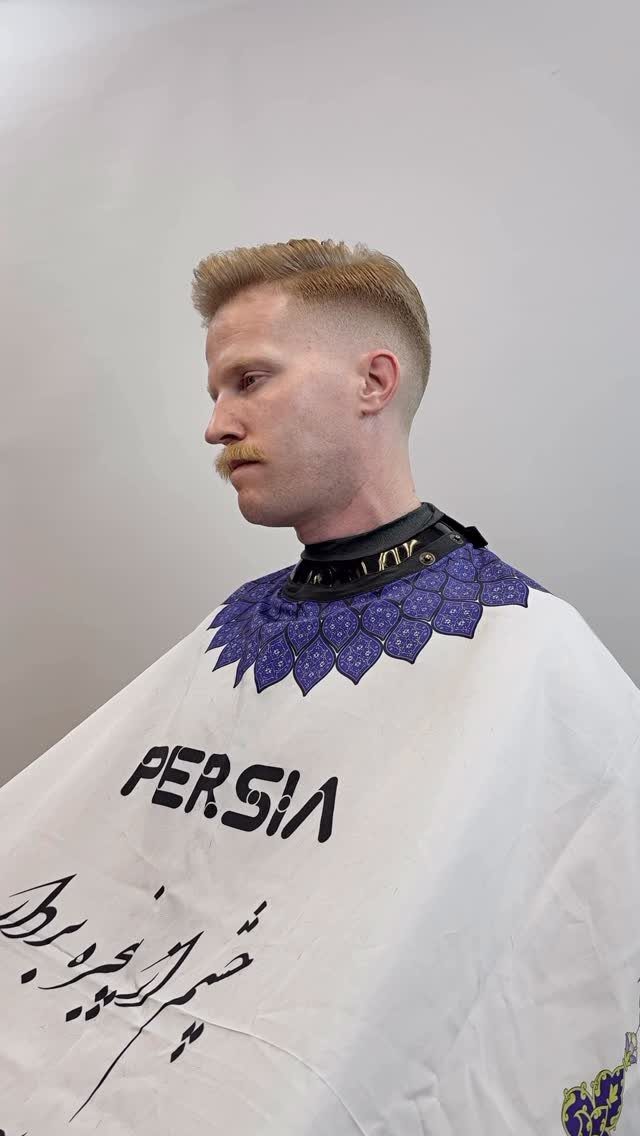
The top is clipped short, usually to half an inch or less, and the mid fade tapers the sides from there. No product, no blow dryer, no morning routine.
If your hair stands up on its own, the crew cut works as-is. If it lies flat, a small amount of paste can add some texture, but most guys skip it.
This one suits anyone who wants a clean look without spending time in front of a mirror.
12. Pompadour
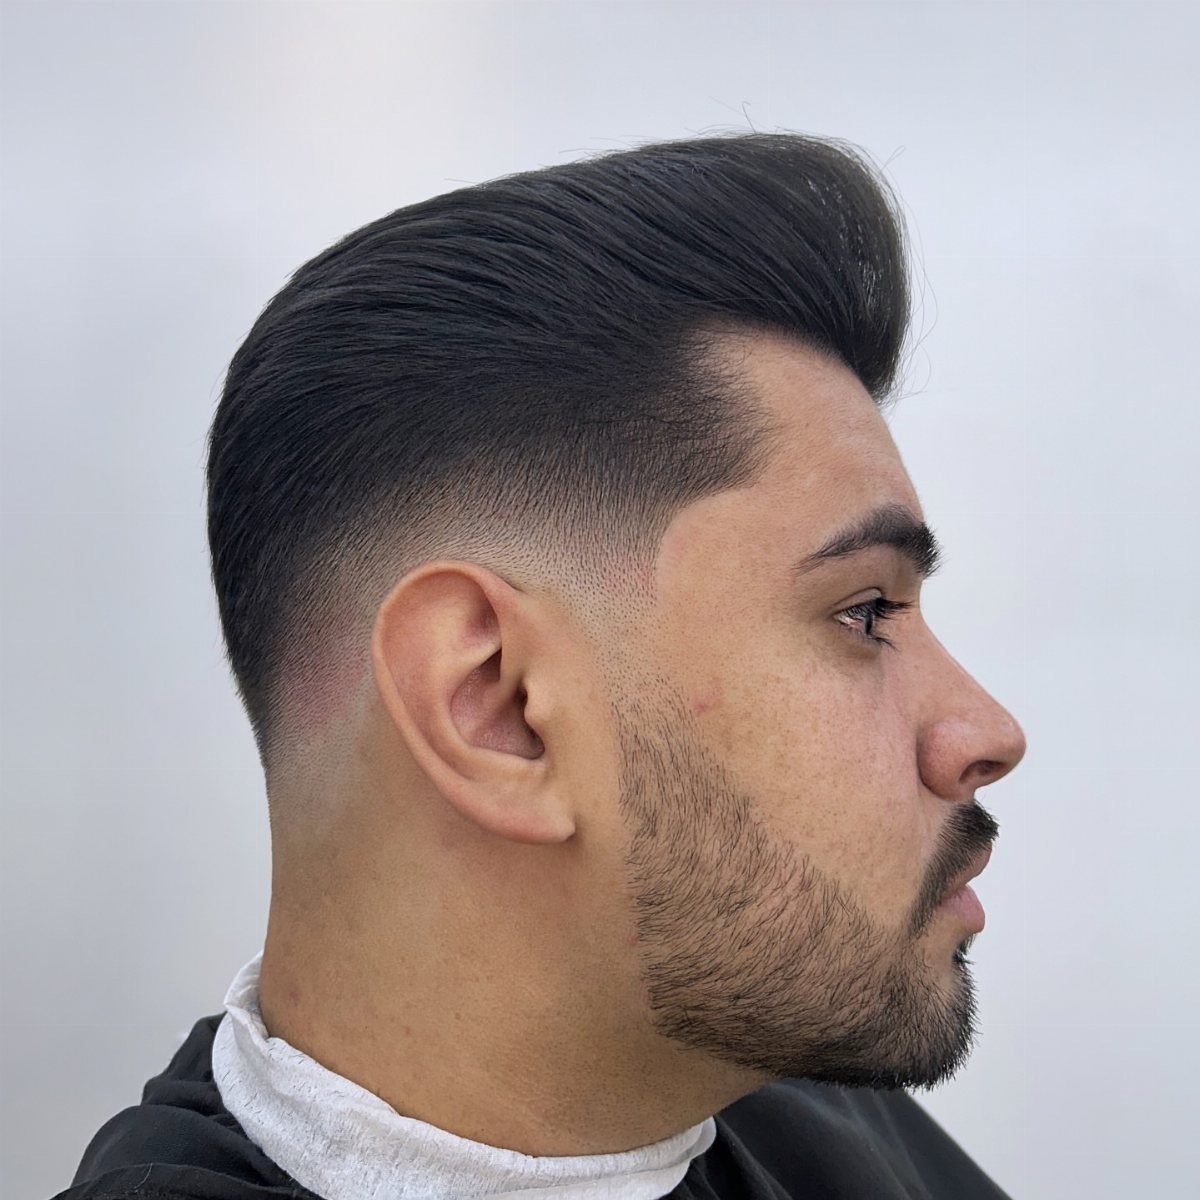
Volume builds at the front by blow-drying the hair up and back, then locking it in place with a firm-hold pomade or gel. The mid fade keeps the sides from adding width.
Styling this one takes longer than most cuts here. Once you have the routine down, styling goes faster but still takes a few minutes each morning.
The pompadour grows out awkwardly once the top gets too long to hold its shape, so regular trims keep it looking deliberate instead of overgrown.
13. Mullet
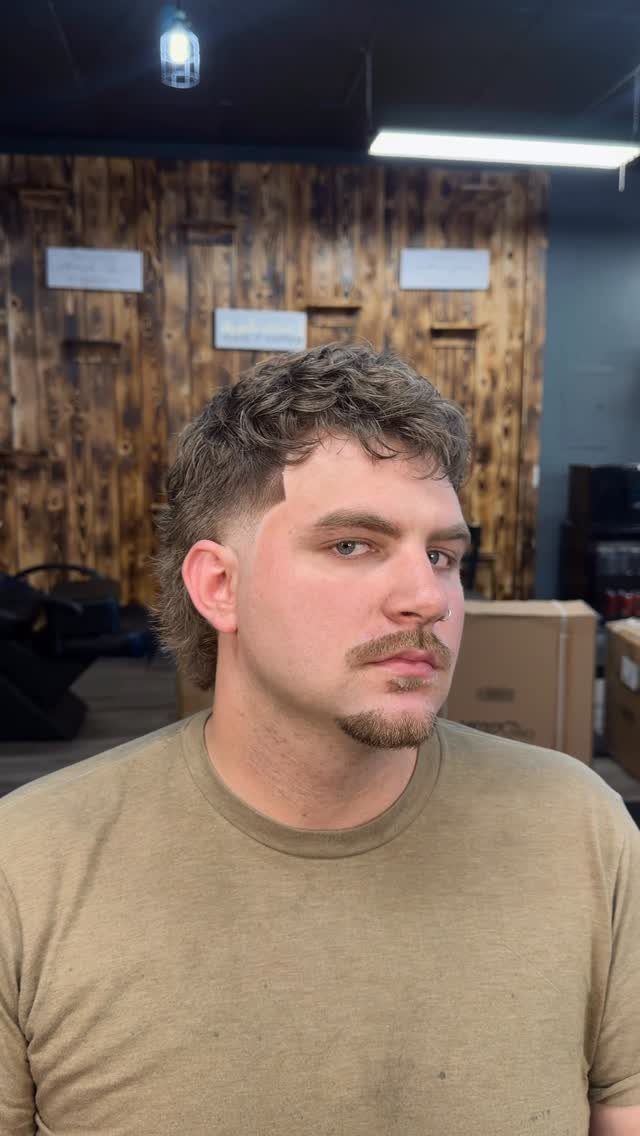
The back is left longer while the sides and front are faded or kept short. The mid fade keeps the sides clean without the business-in-the-back length feeling disconnected from the rest of the cut.
Styling depends on what the top is doing.
If the front is textured or brushed forward, that takes the usual paste or clay. The back can be left loose or trimmed into a shape, depending on how controlled you want it to look.
This one grows out in stages. The fade blurs first, then the back gets longer, so expect touch-ups every few weeks if you want the shape to stay deliberate.
14. Afro Top
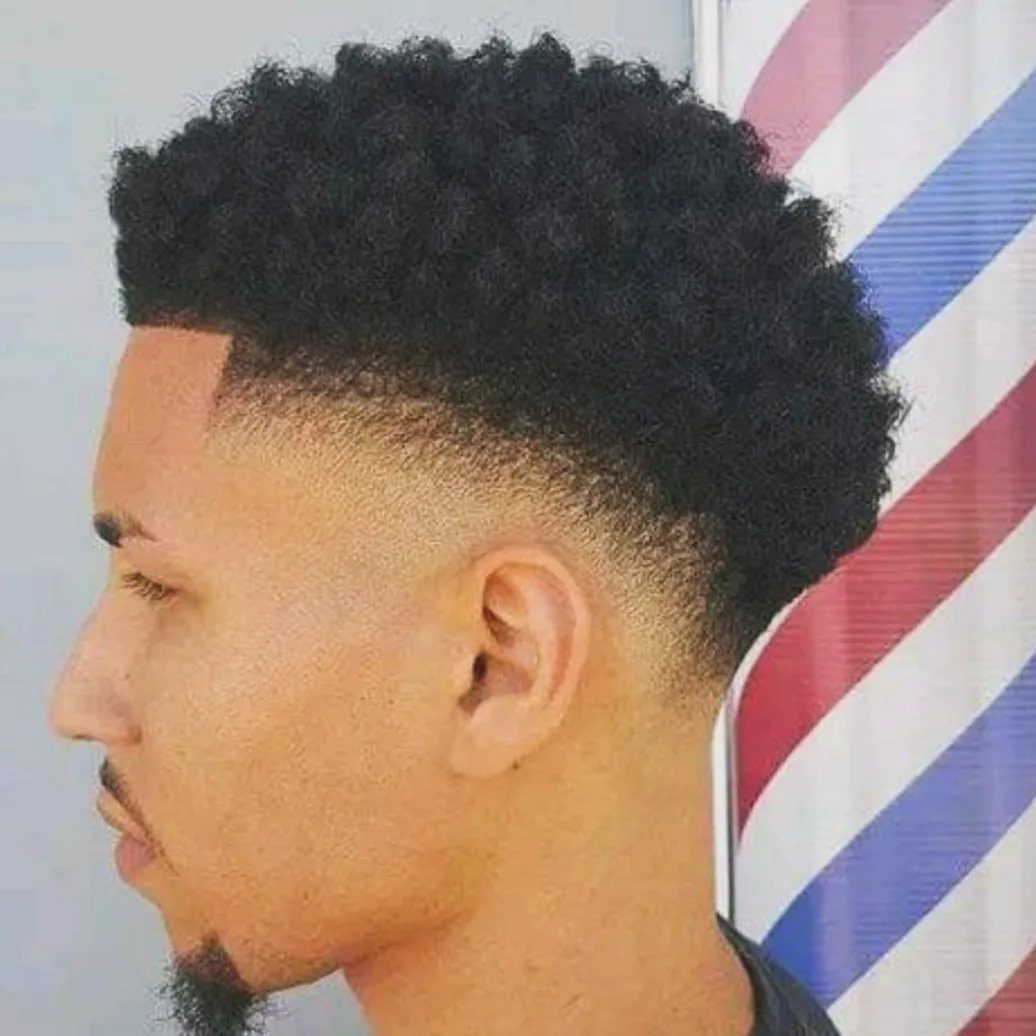
The sides drop short while the top keeps its full coil and volume. The height and volume stay concentrated above the fade line, so the shape reads cleanly from the front and sides.
Styling is about moisture. A sponge or pick keeps the volume even as it dries.
The fade keeps the sides from adding bulk, but the top needs regular shaping to hold its rounded profile. Plan on trims to keep the silhouette balanced.
15. Faux Hawk
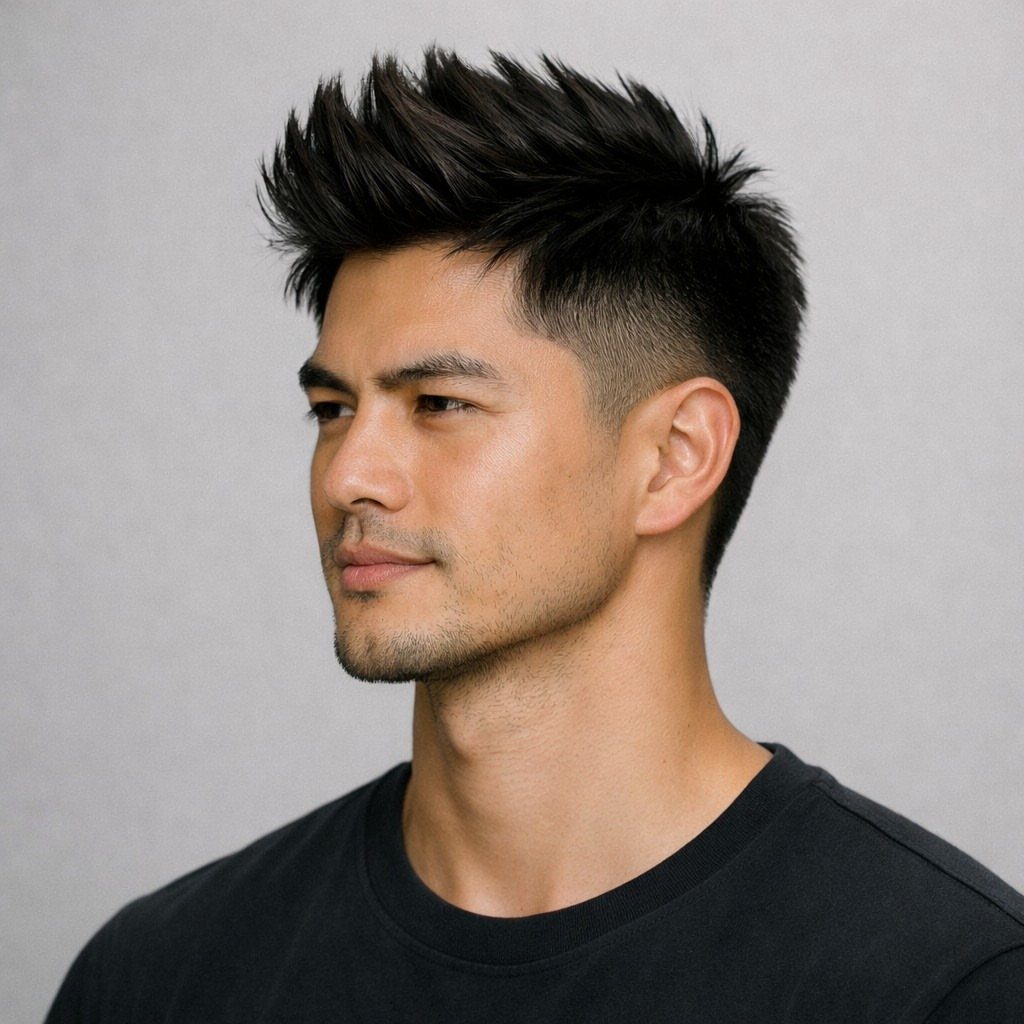
A raised strip through the center gives a mohawk-like shape without a full mohawk. The sides fade down while the top is styled or cut to stand higher through the middle.
Blow the center strip upward with a round brush or your fingers, then hit it with strong-hold pomade or gel. Styling takes a few minutes once you know where the hair wants to lift.
Straight or loose-wave hair holds the height best; tight curls fight the shape. Curly hair can do it, but expect more product and more time fighting the natural direction.
16. Burst Fade
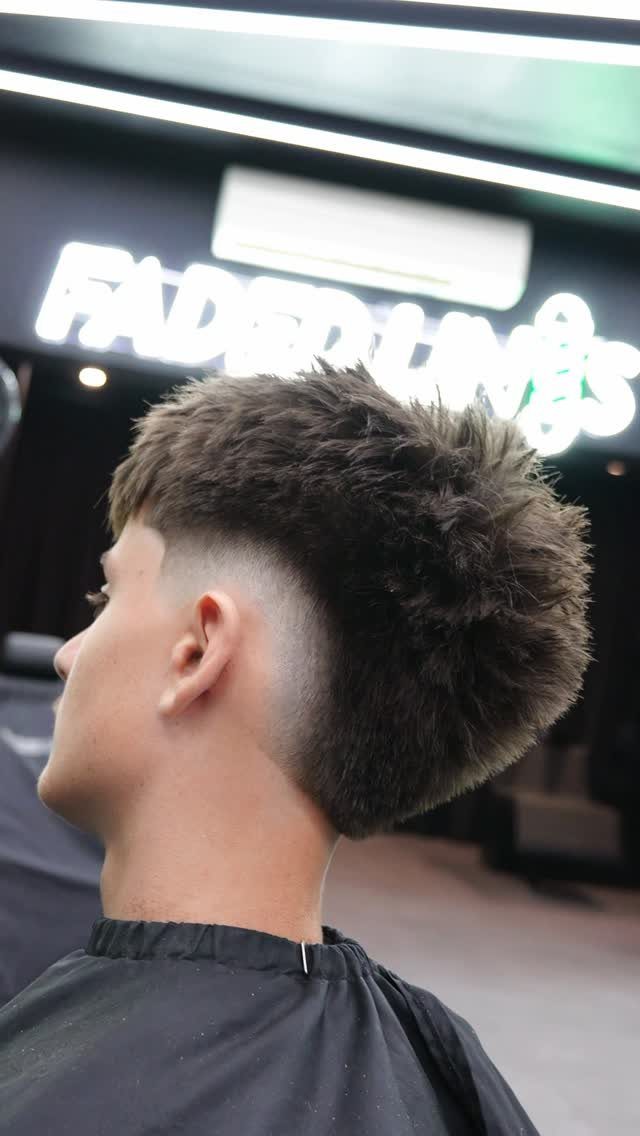
Instead of a straight vertical line, the fade arcs in a half-moon around each ear. The curved profile flatters rounder face shapes and suits hair that sweeps back or sits textured on top.
Ask for a burst fade that follows the curve of your ear. The fade can drop lower behind the ear or stay level, depending on how much contrast you want.
The burst grows out more gradually than a straight fade because the curve softens as the hair fills in. You’ll still need regular cleanups, but the shape holds longer between visits.
17. Mid Fade Design
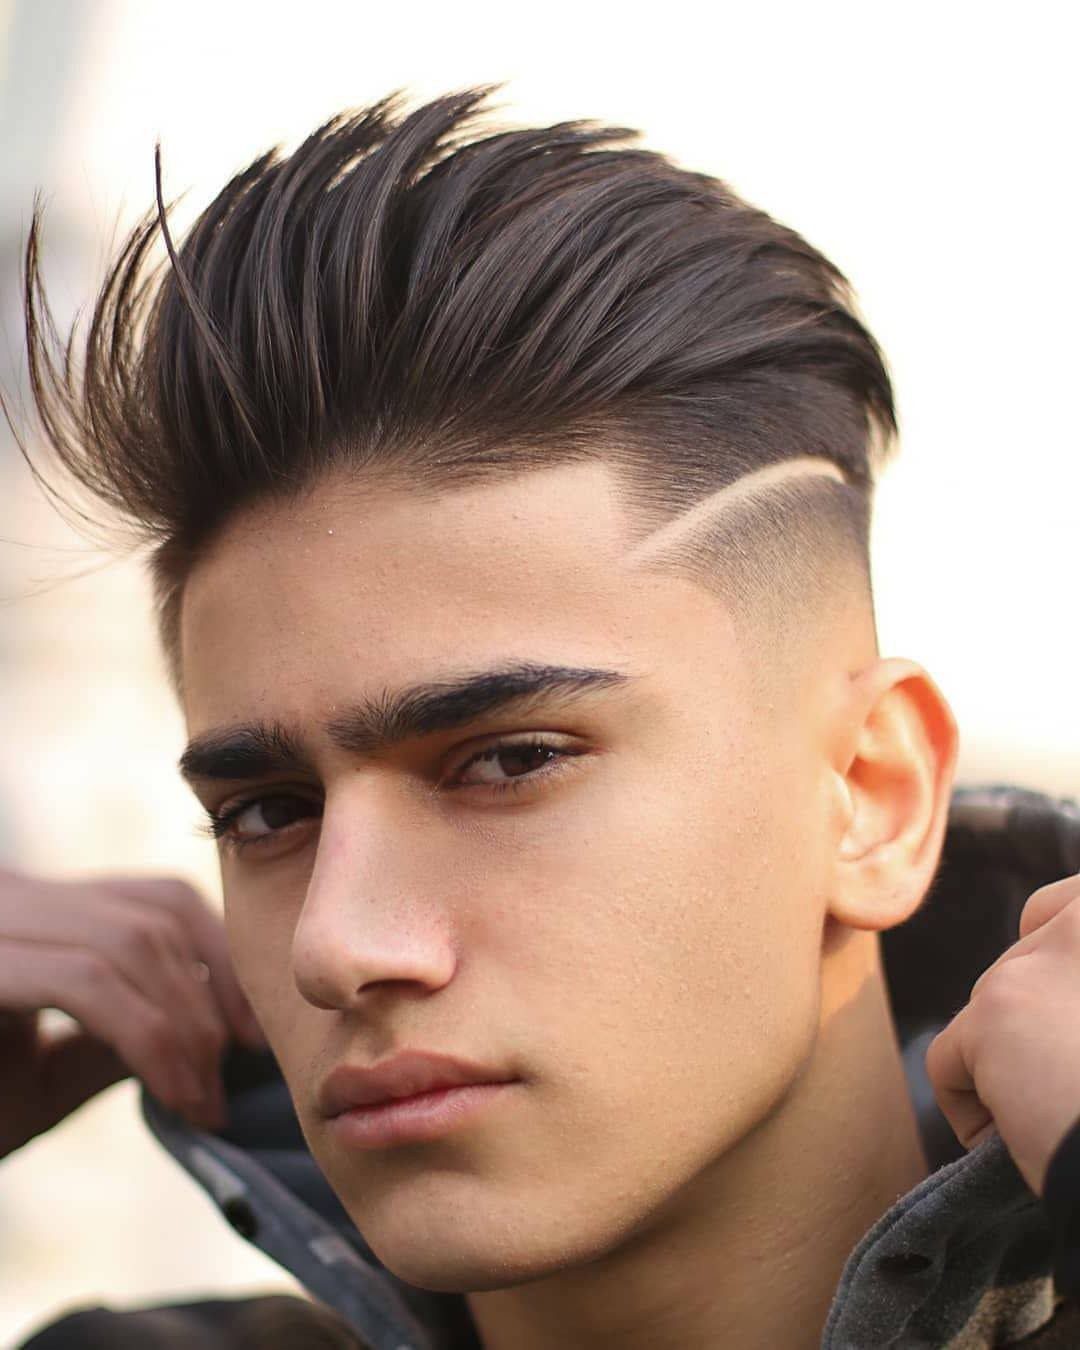
Shaved lines, curves, or geometric shapes add detail to the faded sides. The design can be simple, a single line or curve, or more involved with multiple elements.
Tell your barber what you want or bring a reference photo. The design is shaved into the fade with a trimmer or razor, and it shows up best on dark hair against a light fade.
The lines blur as the hair grows in, usually within a week or two. If you want the design to stay sharp, plan on frequent touch-ups.
18. Mid Fade Undercut
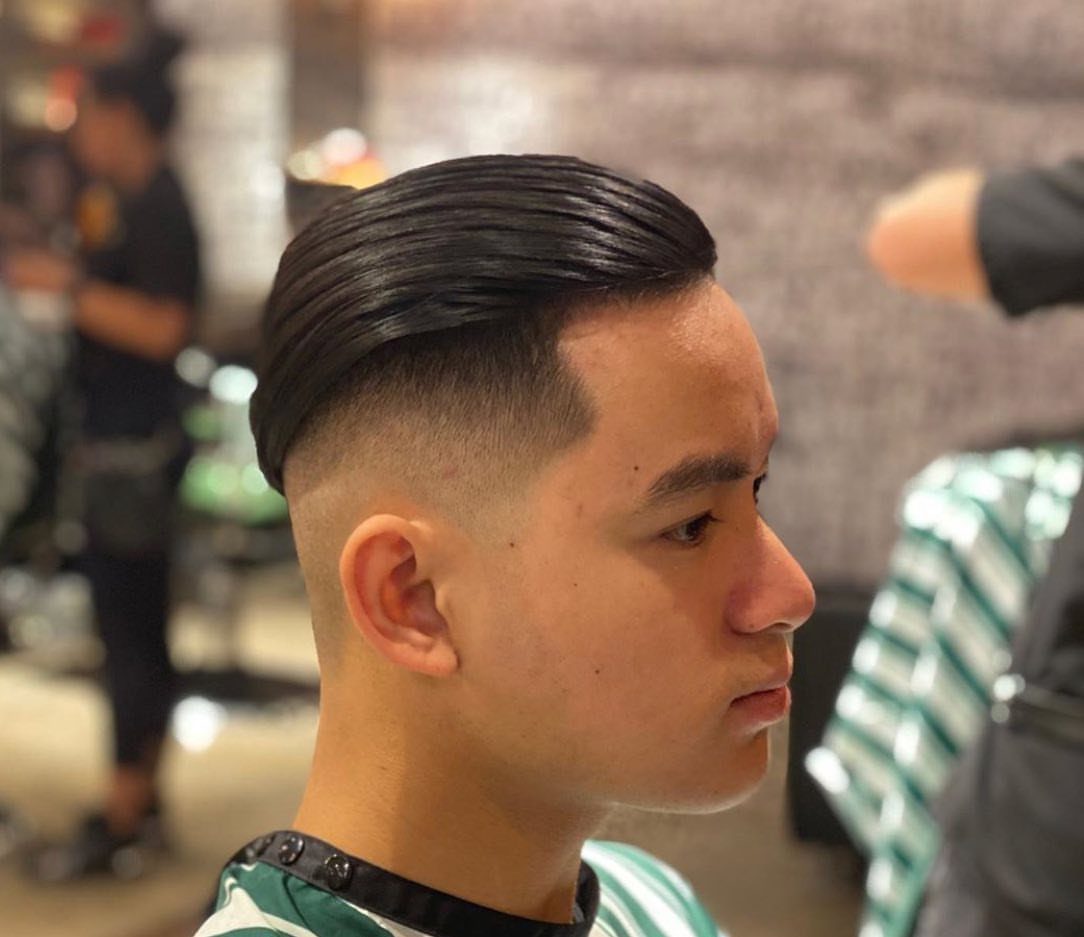
A much shorter side section contrasts with the longer top. The undercut skips the gradual blend of a fade and goes straight from long to short, usually with a visible line where the lengths meet.
Styling the top is the same as any other cut with length on top. The sides stay short enough that they don’t need product.
The undercut grows out differently than a fade. The line stays visible as the hair gets longer, so if you want to grow it out, expect an awkward stage where the 2 lengths don’t quite match.
19. Mid Skin Fade
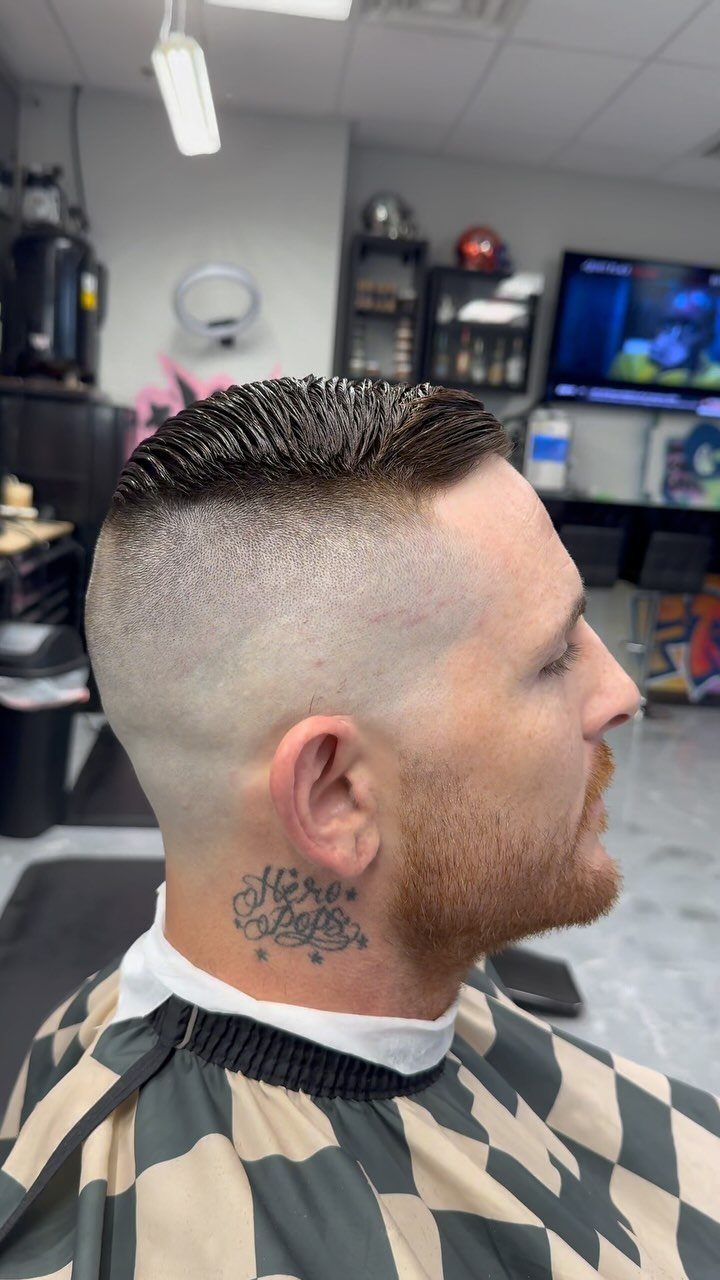
The fade tapers down to bare skin, usually starting around the temple and dropping to nothing by the ear.
The contrast between the skin and the top is sharper than a standard fade, and the look stays crisp for about a week before the hair grows back enough to soften the line.
Maintenance is frequent. The skin line grows out fast, so this one asks for frequent touch-ups.
20. Textured Fringe
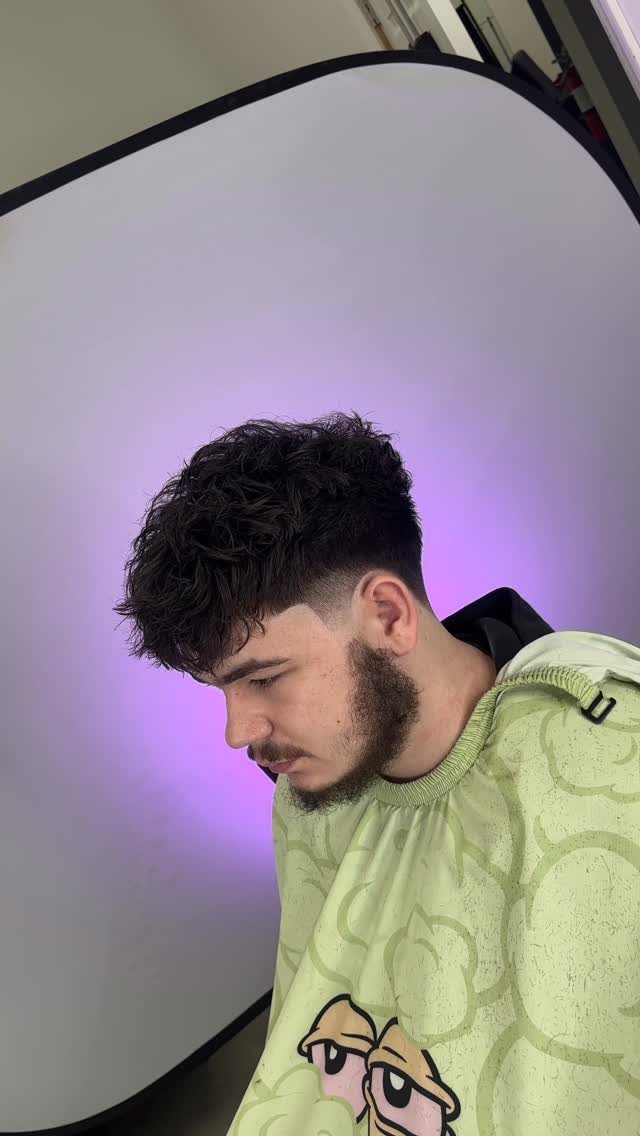
The fringe is cut or point-cut into uneven pieces that fall forward over the forehead, giving the front a relaxed, lived-in look. The mid fade keeps the sides from adding bulk while the fringe does the styling work.
Run a small amount of matte paste or clay through damp hair, push the fringe forward with your fingers, and separate the pieces. Styling takes under a minute once you know where the fringe wants to sit.
21. Mid Fade with Beard
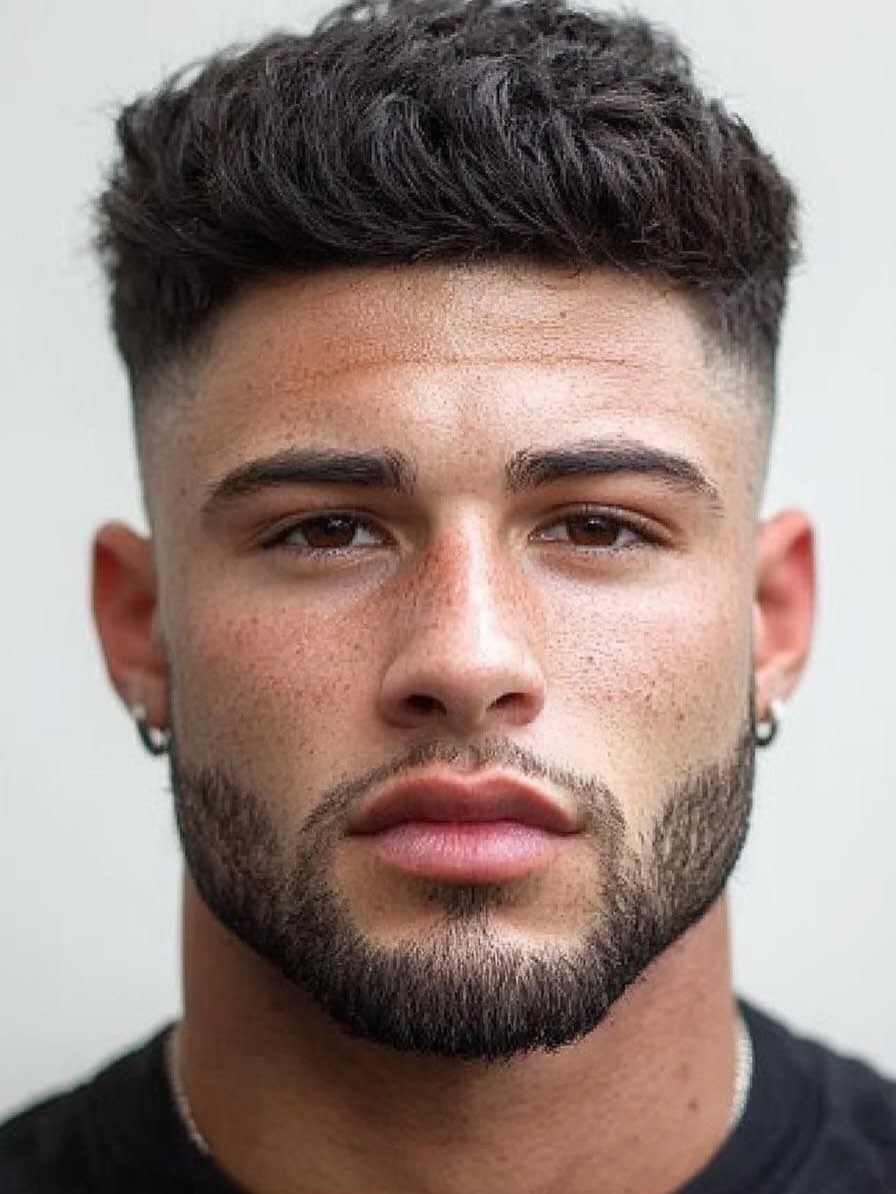
The fade tapers into the beard line instead of stopping at the jawline, so the haircut and facial hair read as one connected shape.
A barber who knows both hair and beards will taper the sideburn into the beard line so there’s no gap or hard stop between them.
If you keep a beard, this gives the cleanest profile. If you shave, the fade stops at the natural beard line and the cut works the same way.
22. Mid Fade Crop Top
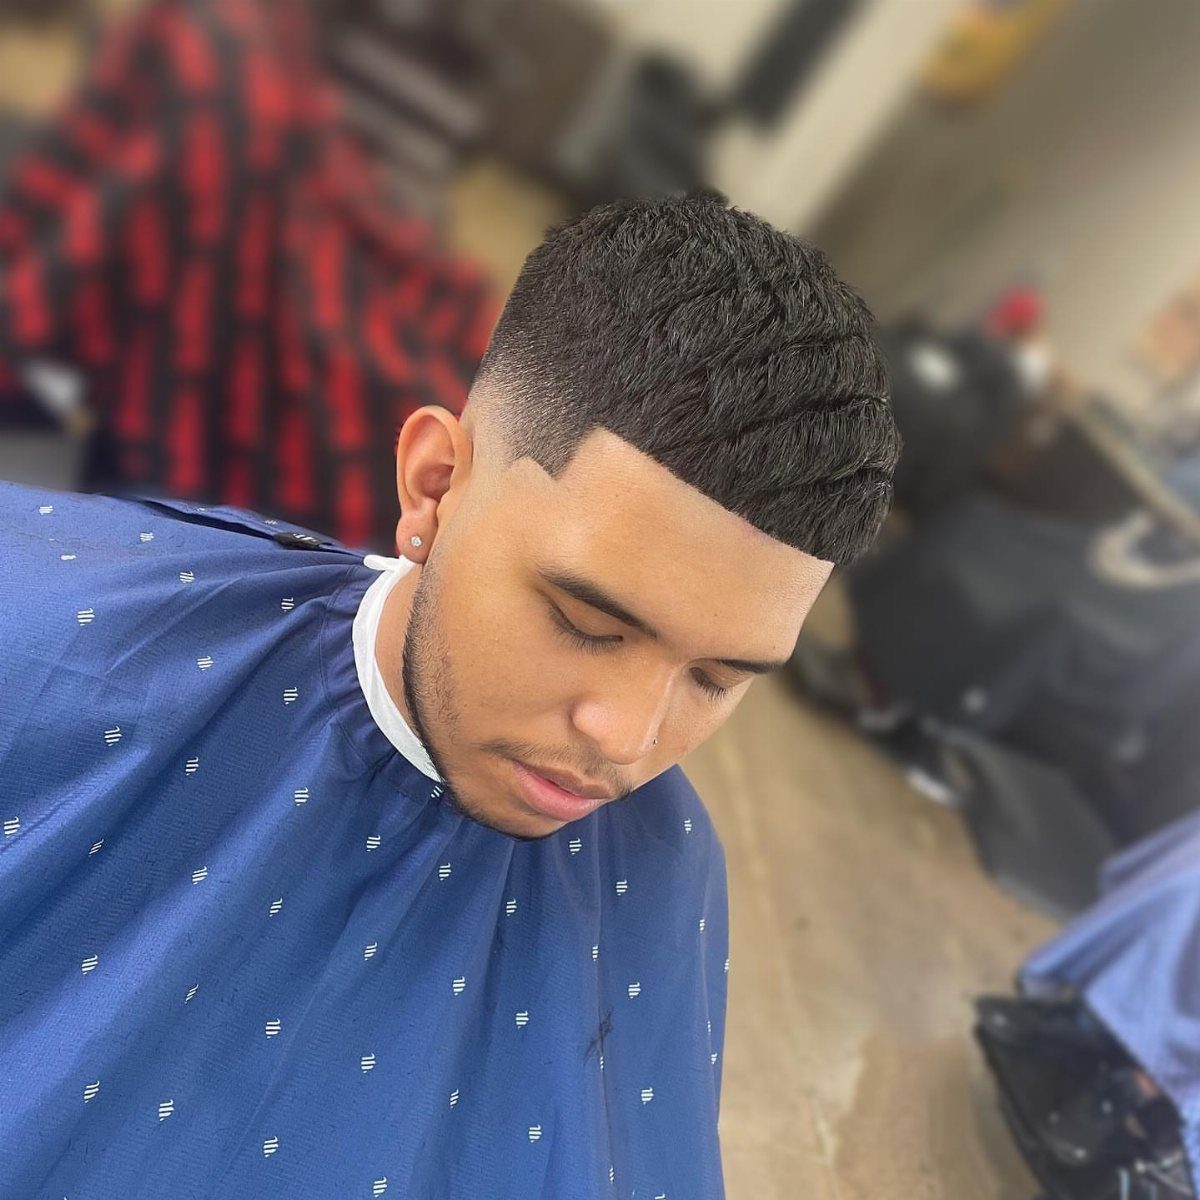
The top is cut short and textured, then pushed forward into a straight or slightly uneven line across the forehead. The mid fade keeps the sides clean while the crop does most of the work up front.
The fringe sits blunt or broken up depending on how you separate it.
23. Long Hair Mid Fade
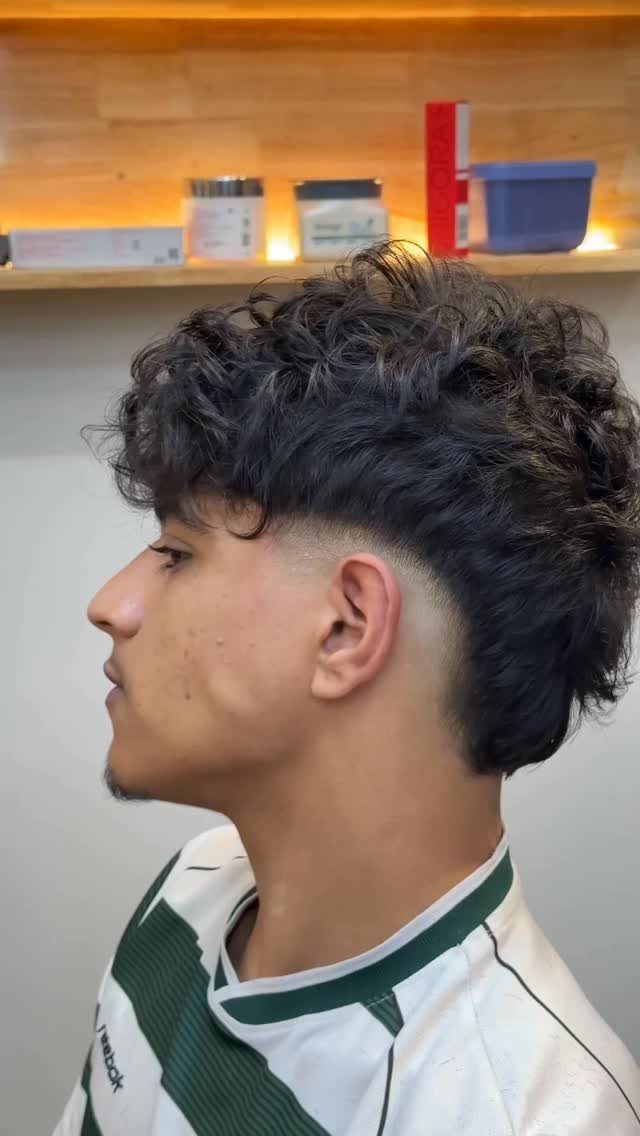
Longer hair on top gives options.
Wear it down, tie it back, sweep it to one side, or tuck it behind your ears. The mid fade keeps the sides from adding weight while the top keeps enough length to move.
Worn loose, it needs a light cream or leave-in to stop it looking dry or fried. Tied back, it needs nothing.
The fade still needs regular cleanups, but the top buys you time between cuts.
24. Mid Fade Fluffy Hair
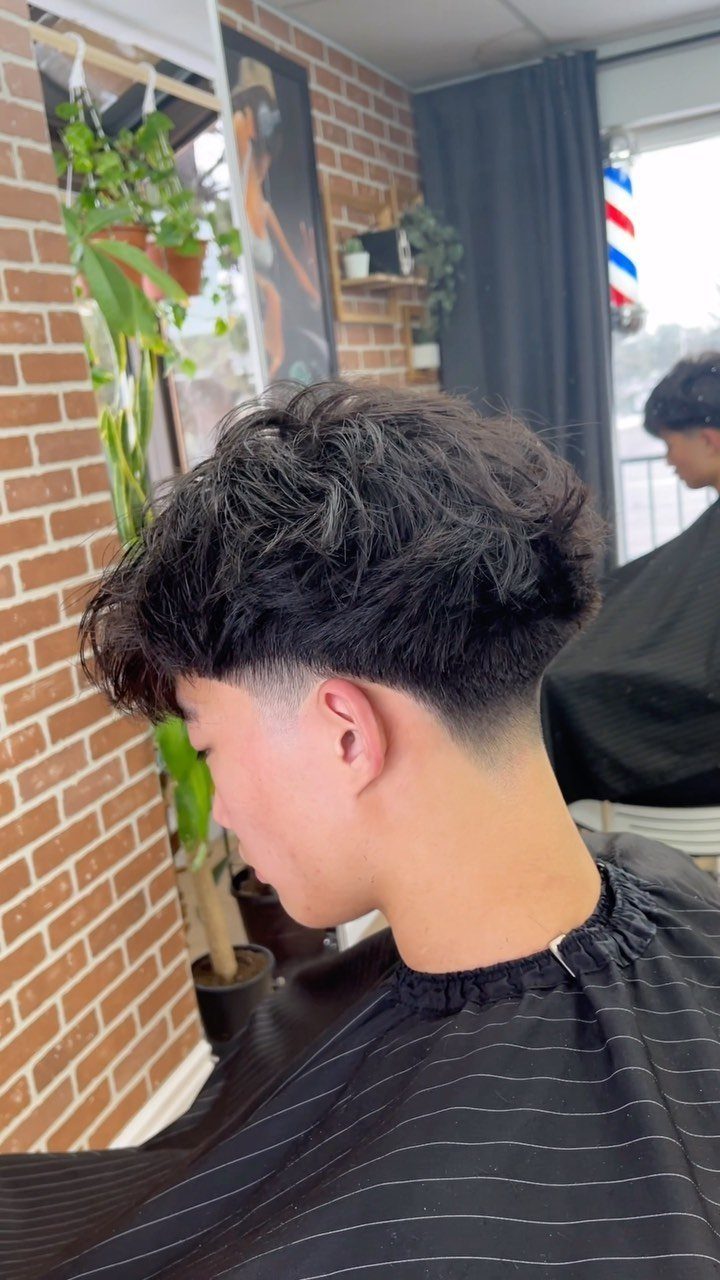
Soft layers on top give the hair lift and movement without looking deliberately styled. The mid fade keeps the sides tight while the top sits full and airy.
Blow-dry the top with your fingers or a round brush to add volume, then finish with a light mousse or sea salt spray. The layers hold their shape without heavy product.
25. Mid Fade Fringe
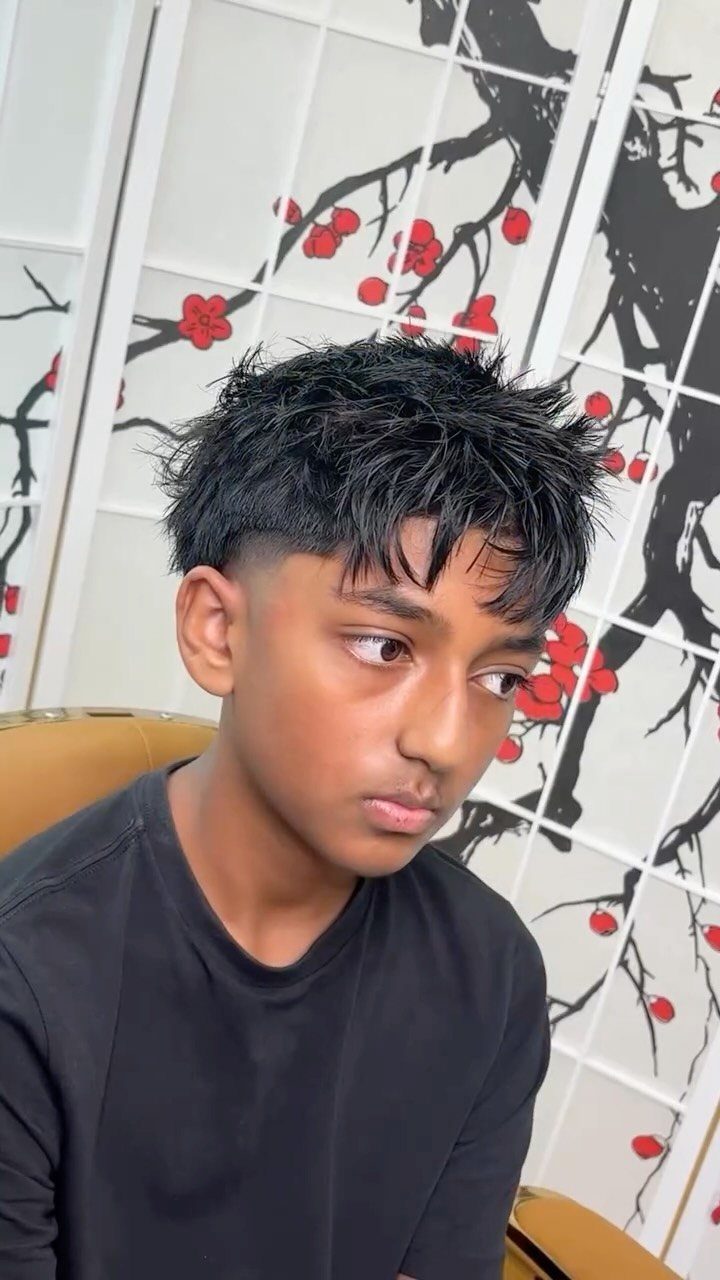
Length on top falls forward and covers part of the forehead, softening the face and drawing attention upward. The fringe can sit straight across or be separated into uneven sections depending on how much texture the barber cuts in.
Most guys work a fingertip of matte clay or light paste through damp hair and push the fringe forward, letting it fall where it wants.
The fade keeps the sides from competing with the fringe, so all the weight sits up front where it matters.
26. 360 Waves Fade
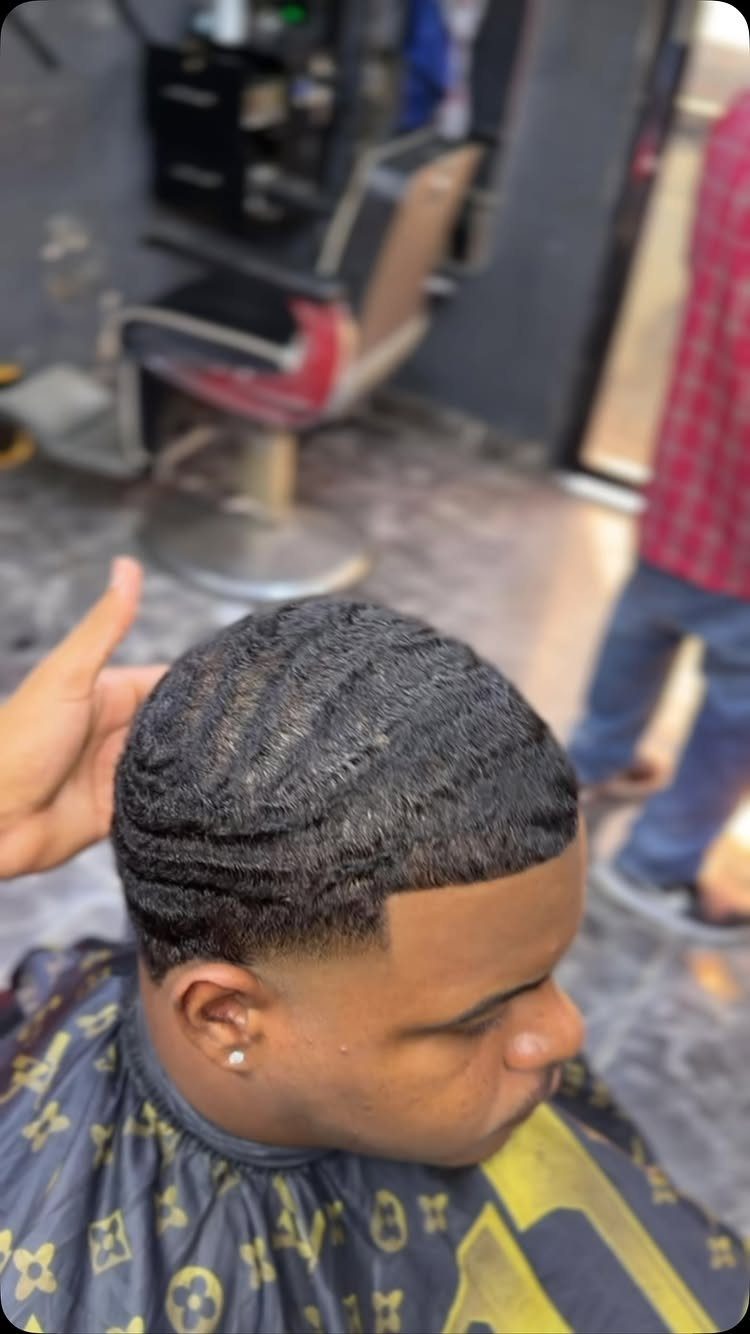
Brushing the hair in a consistent pattern trains it into waves that ripple outward from the crown. The mid fade keeps the sides short while the waves sit visible on top, following the natural grain of the hair.
Getting the waves to show takes daily brushing, usually with a wave brush, plus a durag or wave cap overnight to hold the pattern. Some guys add pomade before brushing to help the hair lay down.
The fade needs regular touch-ups to keep the wave pattern from blurring into the sides as it grows.
27. Mid Fade with Brush Up
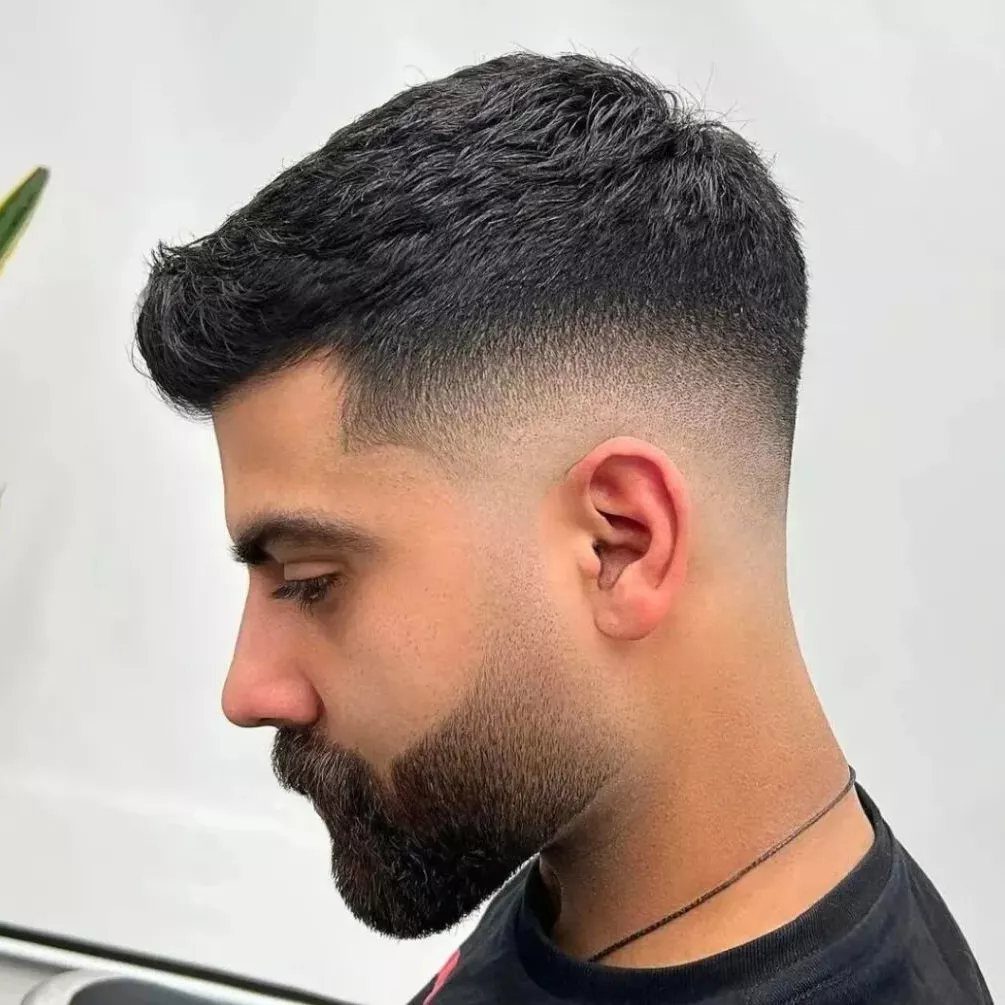
Point the dryer up from the roots and pull the hair back just enough to clear your forehead, stopping well short of pompadour territory.
A vented brush or your fingers will direct the hair as it dries, then a medium-hold pomade or paste locks it in place.
Styling takes a couple of minutes once you know which direction the hair lifts easiest. Straight hair holds the shape with less product; wavy or curly hair needs more hold to stay upright.
The fade simplifies the sides so the height on top reads cleanly without looking overdone.
Fade Upkeep and Styling
Skin fades blur faster because the contrast is sharper at the start, so if you’re going down to bare skin, expect to book a touch-up closer to the 2-week mark.
A hard part loses its edge after a week and needs a razor pass to stay crisp.
If you’re running a skin fade and spending time outdoors, the newly exposed scalp can burn. I apply sunscreen to the faded section the same way I would to my face, especially in summer.
Use a clarifying shampoo once a week if you’re using paste, pomade, or gel daily. Product builds up on the scalp and makes the top look dull, even when the fade is fresh.
Choosing for Face and Hair
The mid fade works across oval, square, heart, round, and long face shapes because it sits in a balanced zone that doesn’t pull the eye too high or too low.
Longer faces can hold more width at the temples, so I keep the fade from climbing too high and making the face look even longer.
Rounder faces benefit from stronger vertical contrast, which the mid fade provides without going as severe as a high fade.
Don’t let a barber thin the curls too much on top; the texture does better left dense and shaped with length rather than thinned into frizz.
Straight hair works cleanly with a mid fade because the cut adds shape without fighting the natural direction.
Fade Height and Finish
Mid describes where the fade starts, not how short it finishes. A mid fade can taper to stubble or drop all the way to skin, so tell your barber both the height and the finish you want.
The blend typically begins halfway between the ear and the temple, and the line runs level from one side, across the back, to the other. Your barber cuts it straight around unless you ask for something different.
Height and finish are separate decisions, and both change how often you’ll need a cleanup.
Frequently Asked Questions
What is a mid fade haircut?
A mid fade starts around the temples, roughly halfway up the sides, and tapers the hair shorter as it moves down toward the ears and neckline.
The fade can finish at stubble or go down to bare skin depending on what you ask for.
The mid fade lands halfway up the sides, threading the space between subtle and bold, which is why it flatters most faces and textures without locking you into one look.
Is mid-fade or taper fade better?
A taper keeps more length at the bottom and grows out more gradually, so you can go longer between cuts. A fade drops shorter and gives a sharper contrast but needs touch-ups every 2 to 3 weeks to stay crisp.
If you want lower maintenance, the taper buys you time; if you want a cleaner profile and don’t mind frequent trims, the fade delivers it.
What are the different types of fade haircuts?
The main types are low, mid, and high, based on where the fade starts on the sides.
Low fades begin their taper just above the ear, mid fades kick off around temple height, and high fades start closer to the crown.
Within those heights, you can choose a skin fade that goes down to bare skin, a taper that stops at stubble, or variations like a drop fade that curves behind the ear or a burst fade that arcs around it.
Does a mid fade go all the way round the back?
The fade wraps the whole head at one height, temple to temple, unless you ask otherwise.
A drop fade curves the line downward as it moves behind the ear rather than holding it level, but your barber won’t do it unless you name it.
How often does a mid fade need cutting?
Most mid fades stay sharp through about 2 weeks, then start to blur. If you want the line crisp, book a touch-up every 2 to 3 weeks.
What is the best medium-length haircut for men?
A mid fade pairs with nearly any top style, so the best cut depends on how much time you want to spend styling.
The fade itself works across professional and casual settings, so choose the top based on your routine and how much product you’re willing to use.